I have a home video showing myself as a 3 year old celebrating my Birthday holding Wizard of Oz figures. I squeal in delight as I open one of my gifts, what is it? My first tube of lipstick, of course. A great shade of red and who knew where that would take me down the road. I guess I have always had a passion for all things beautiful, on the inside and out. I love makeup and it has always been a passion of mine. I would like to introduce the wonders of highlighting and contouring. Highlighting and contouring has been done for ages, the greats such as Kevyn Aucoin showed documented details about what products to use and how. The likes of Kim Kardashian's made it
BOOM into a normal makeup staple, just like mascara, you need your highlighting and contouring products that you know you can rely on to achieve that supermodel-look-at-my-amazing-bone-structure-look.
Here are some of my favorite products:
First: start with your clean, blank face. Usually I start out by doing eye-shadow first so anything that flakes off will not ruin the face makeup. I also apply the fake eyelashes and then proceed onto the face. I use a primer such as:
or
MAC is 99% of my staple and has been since the beginning but I have ventured and found a few products that I love. These are all great primers and will help create a smooth and flawless palette for you to achieve the look.
Next I use concealer under my eyes, by my lips and sometimes around my nose if needed. I swear by MAC's
This stuff is amazing. It covers any dark circles or veins or anything else you can imagine. I put this on using a MAC
#195 concealer brush. This puts the concealer on perfectly and flawlessly.
Second I like to use touche' eclat' along the bridge of the nose, around the nostrils, in the corner of the mouths to brighten up that area and the chin to make it look more projected. I apply and blend it in very well.
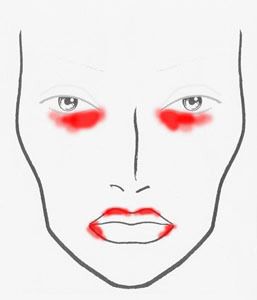
Now it's time for the cheekbones. I have a few staples I like to use for highlighting. I apply a liquid highlighter (Watts up!) with the built in applicator in a sweeping motion under the eyes and towards the hairline. Be sure to quickly blend this one with your fingers as it dries fast and becomes immovable.
I like to enhance the highlighting with powder and I like to use the banana and vanilla color from Anastasia's Contouring Kit.
Now for the fun part! Contouring (shading) can be rather flat and dull without the highlighting, but in the end, contouring is what makes the most difference.
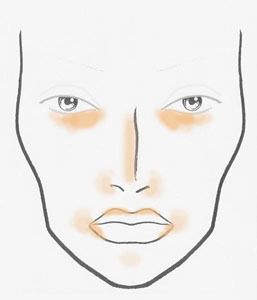
I use one of the darker shades in the Anastasia kit for contouring and I also like to use Kevyn Aucoin's
What I like about this powder is the color is not muddy and it looks like a natural shadow opposed to an orange color or something unnatural like some contouring shades tend to be.
I also like to use MAC's darker eye-shadows for contouring since the pigment is so good and it blends effortlessly. One of my favorite brushes for contouring is MAC's #163 flat contour brush.
This brush makes it insanely simple to get that perfect line for contouring those cheekbones. Brush and build the contouring shade of your choice in the hollows of the cheeks. When you extend this color, do so down, not up. Make sure it doesn't just stop, either. Then apply your contouring shade along the jawline, but from below. Making it look sharper and more defined. That strong jawline is almost as commanding as those amazing cheekbones. Next, a small fluffy brush contours the nose lightly. Try to accentuate the natural bone rather than adding something that isn't there. For a narrower nose, contour the sides. For a shorter one, contour from below and of course make sure to blend, blend, blend!
Tools are as important as your product, some of my favorite tools are:
Sincerely,